

Android SDK Setup
SDK Setup
Get access to the Cards Sdk
We host all our SDKs on a remotely accessible Maven Repositry. Gradle understands the semantics of a maven repository and can download the SDK artifacts ( aar files) from a remotely hosted maven repository.
Add the following lines to your project level build.gradle

 Switch Theme
 Expand More
 Copy
Copy
|
|
 Code Copied
 Add the Cards Sdk to your app
- To your module (app-level) Gradle file (usually app/build.gradle), add the dependency for the cards SDK
Switch Theme
Expand More
Copy
|
|
Code Copied - Add kotlin JVM target to your if you are using Kotlin as your programming language
Switch Theme
Expand More
Copy
|
|
Code Copied - (Optional) Custom packaging options if you face issues with packaging:
Switch Theme
Expand More
Copy
|
|
Code Copied Add permissions to your AndroidManifest.xml
Add the following permissions in your app’s AndroidManifest.xml.
Switch Theme
Expand More
Copy
|
|
Code Copied Cards SDK uses these permissions to get the network state and take actions accordingly.
Add the config json file to your project
Add the cards.json file received from Zeta to the app/src/main/assets folder. A sample file looks like this.
Switch Theme
Expand More
Copy
|
|
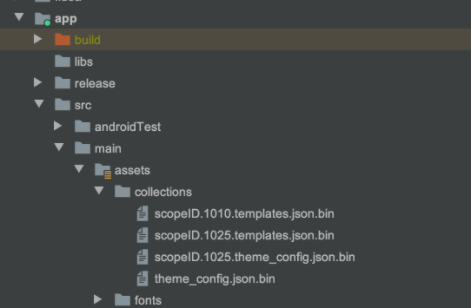
Code Copied Adding theme and template files
Card SDK provides you with the capability to define the theme and layout used by the SDK. These can be edited remotely so you won’t have to ship a new app build for changing how your view looks. To deal with first-time initializations, it’s preferable to ship a local copy of files defining these with your app. You will receive files of format scopeID.app/src/main/assets/collections folder. Add the collections folder if you already don’t have that. Files once added will look as follows with Project view in Android Studio:
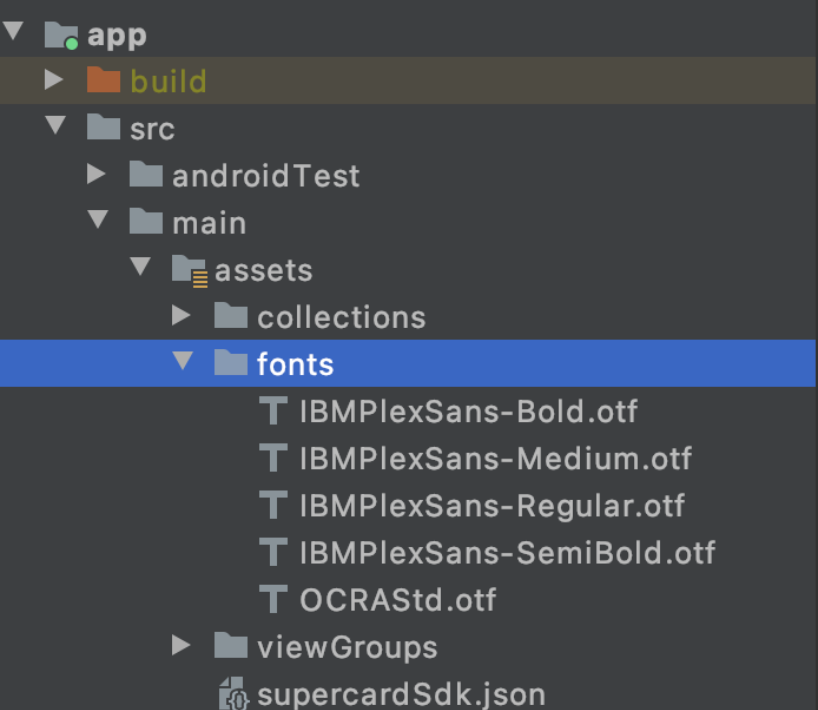
Add the font files to your project
To use the fonts the same as your app and give the user a similar experience, you should add your font files in the app/src/main/assets/fonts folder of your project. You can provide font files in either ttf or otf formats. Font files once added would like as follows with the Project view in Android Studio:
Instantiating Cards SDK
Once you have completed the Setup for the SDK, you are now ready to create an instance of CardsService. Add the following code to your app’s Application class (Create a one if you haven’t yet). Inside your Application class, add the following code.
Switch Theme
Expand More
Copy
|
|
Code Copied
Switch Theme
Expand More
Copy
|
|
Code Copied Following is the description of each of the builder methods
- setSecuredStoreTitle
- Pass the string resource for your application name. We use this to show over the device lock screen when asked for user authentication.
Note: This is a necessary field. An exception is thrown if this is not provided.
- setSecuredStoreSubtitle
- Pass the string resource for your sub-title you may want to show on the device lock screen.
Note: This is a necessary field. An exception is thrown if this is not provided.
- setFontMap
- Create a font map and set it to the builder. The card SDK will, then, use the mentioned fonts while rendering the views offered by the SDK. The file names here refer to the files that you had put inside the assets folder.
Note: You can invoke CardsServiceBuilder(..) only once per app session. To get an instance of CardsService anywhere in your application, use the following code snippet.
Note: It is recommended to create the CardsService instance as the first step when the app is launched. You can do it inside your Application class.
Switch Theme
Expand More
Copy
|
|
Code Copied
Switch Theme
Expand More
Copy
|
|
Code Copied Authenticating Cards SDK
Why authenticate the Cards SDK?
Once your user has logged into your mobile app, you already have a session for the logged in user. Then why do you need to separately authenticate the Cards SDK? This is needed to authenticate the user in the issuer’s domain. The logged in user is identified in your app domain. But this user is not identified in the issuer’s domain. The account holder ID is identified in the issuer’s domain. Through the process of SDK Authentication, you will authenticate your user in the issuer’s domain as an account holder ID.
You can authenticate the Cards SDK by invoking the SDK’s authenticateSDK function. The function expects a JWT token referred to as tenantAuthToken in the subsequent discussion. The tenantAuthToken contains the account holder ID in the issuer’s domain as “claim” of the JWT token. The tenantAuthToken needs to be computed in your backend as it needs sensitive information to create the token. The information used to generate the tenantAuthToken should never be compromised.
As and when your user is logged into the app, your app should fetch the tenantAuthToken from your backend service. This is a one time activity and can be clubbed with the login flow of the mobile app.
Validity of tenantAuthToken? The validity of the tenantAuthToken can be kept the same as the validity of the logged in user of the mobile app.
Once the mobile app has fetched the tenantAuthToken, it should initiate the SDK Authentication flow as suggested in the code snippet below. This is a one time activity and should be only done along with the login flow of the app.
Switch Theme
Expand More
Copy
|
|
Code Copied
Switch Theme
Expand More
Copy
|
|
Code Copied Setting up the SDK
This step triggers the actual setting up of the Cards SDK. Once this step is completed, the SDK will initiate background sync of the card details of the user. One critical step is setting up the secure storage on the mobile app. Secure Storage refers to the encrypted storage which is behind device lock or custom app pin authentication.
For secure storage, the SDK always prefers device lock over custom app pin authentication. Setting up secure storage may require the user to provide device lock authentication. In case of custom app pin authentication, it may require the user to set up the app pin or provide the app pin. The first invocation of the setupSDK function call may require user intervention. Subsequent invocation will not require any user intervention.
Switch Theme
Expand More
Copy
|
|
Code Copied
Switch Theme
Expand More
Copy
|
|
Code Copied When should the setupSDK call be made?
setupSDK call should be made on every launch of the app
On first launch, the setupSDK could be part of the onboarding flow of the app i.e. the time when it is appropriate for the mobile app to set up device lock authentication. Nonetheless, it should always be called after the SDK authentication step.
On subsequent launch of the app, it should be called as early as possible. You can invoke it inside the onCreate() method of the launching activity of the mobile app.
Under the hood, the setupSDK function triggers the SDK to set up secure storage. On first launch, the secure storage is actually set up. While in the subsequent launches, since the setup is already done, it simply does nothing and returns success.
Once the secure storage is set up, it triggers the SDK to background sync the card details of the user. Once the card details are fetched, the SDK needs to persist it in the secure storage for subsequent offline access. The SDK will do the “persist to secure storage” operation in the background only if the secure storage is “unlocked”. This is often the case during the first launch since it has been just set up and it is left unlocked. But in subsequent launches, this may not be the case. The SDK will never initiate unlocking the secure storage unless explicitly asked by the mobile app. For this purpose, the SdkInitListener will fire an event “Secure_Storage_Unlock_Required” to let the mobile app know of such a need. At this stage, the mobile app may, whenever it feels appropriate, invoke the SDK function - triggerSecureStorageUnlock. This will let the SDK trigger secure storage unlock. This will require user intervention. Post unlock, the SDK will persist the card details to the secure storage.
Note: In most of the cases, it is sufficient to sync the cards details only during the first launch. Subsequent background sync results in no further data. But in case the sync fails after the first launch or new card is added for the user etc kind of scenarios, the background sync may result in newer data to be persisted to the secure storage.
SdkInitListener
The setupSDK function takes as input a listener which provides regular updates about the status of the SDK setup. The various events thrown by the listener are mentioned below:
- Secure_Storage_Setup_Done
- This event denotes that the secure storage setup is completed. At this point, the SDK will trigger the background sync of the card details.
- Background_Sync_Done
- This event denotes that all the card details have been successfully synced from the server.
- Card_Details_Persisted_To_Secure_Storage
- This event denotes that all fetched card details have been successfully persisted to the secure storage. Now these details are available for offline access. This marks the complete completion of the setup.
- Secure_Storage_Unlock_Required
- This event denotes that all the card details were fetched, but because secure storage is not unlocked, the details could not be persisted to the secure storage. This event means that the mobile app should now call the triggerSecureStorageUnlock SDK function so that SDK can persist the card details to the secure storage.
Listen to the listener for success. You can access the Cards SDK APIs